Cut, Copy & Paste

One of the best time savers in computing is the oft misunderstood process cutting or copying text, pictures and files and pasting them into a new location. Cutting and copying share a common property in that both operations put the targeted object in memory for immediate use. The difference is that cutting removes the object from its original location while copying leaves it in place.

Cut Copy PasteYou may wonder why the Paste bottle is upside down. I teach my students to use keyboard shortcuts. So it’s easy to remember Ctrl+X for cut, because an X looks rather like scissors; and C for copy (Ctrl+C) because copy starts with C; but where is the V (Ctrl+V) in Paste? You have to turn the glue bottle upside down to paste, right? So look for a V in the tip.

Selecting objects is also commonly done via right-clicking on PCs and control-clicking on a Mac. Be sure to check out “Pop-up Menus the Right-Click Way” if you’re mainly a mouse user.

To cut or copy an object it must first be selected. You don’t have to be a novice to miss that step. My eyes are great at selecting stuff on a computer screen, but I still have to click or drag my mouse to make the computer understand me. For instance, if I’m selecting text I might drag my mouse from the beginning of the first word to the end of the last, or double-left-click a single word, or triple-left-click a paragraph. Or if I want a picture I might drag my mouse pointer from the top left corner to the bottom right, or sometimes simply right-click if I want the whole picture. If on the other hand I want a complete file I would navigate to that file, right-click and choose copy. (Hint: In Windows use the Snipping Tool and on a Mac use the Grab utility to select pictures from your computer screen.)

With an object in memory it can be pasted into a selected location. There’s that darn selection process again. When selecting a spot to paste an object I need to see a blinking cursor if pasting into a text document, because that’s where my paste will take me. Then I can choose how the object reacts with any text already in place. When pasting onto a blank canvas of an image application you usually need only to be sure your app has the focus. In either case you can move your object around by dragging it with your mouse.

You can do it!
Dyslexie: A Computer Font for People with Dyslexia…and Older Eyes, Too

I never thought of myself as having dyslexia, but when I read an article on Dyslexie, a font created for dyslexics, I began to wonder if perhaps I had acquired it in my many years on the planet. For instance, I was once an avid reader, but now I can hardly finish a book – largely due to failing eyesight.

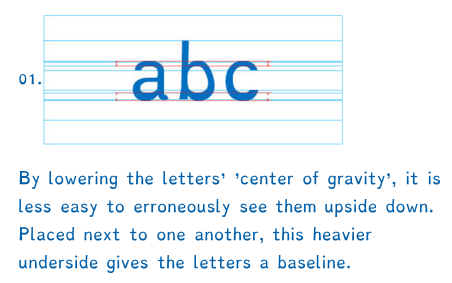
Heavier BaselineThe beauty of Dyslexie is that the letters are much more differentiated than standard fonts and punctuation is more pronounced, making it easier to distinguish each letter and less likely to confuse an 8 with a B, or a capital O with a zero for instance. In my years of reading serial numbers and program installation codes those were two of my nemeses.

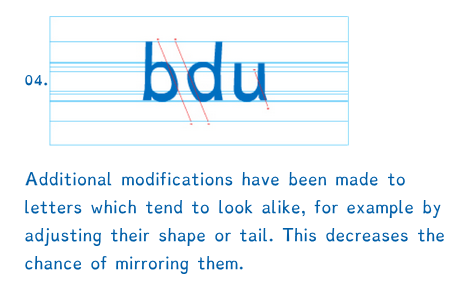
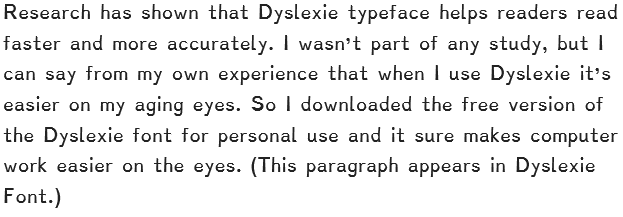
Slant for mirrorIf you have dealt with dyslexia you know that dyslexics tend to see letters in mirror image or upside down. The Dyslexie typeface improves letter recognition by making parts of letters longer, or wider or slanted a little differently so that they are less easily confused. I borrowed the two examples above from DyslexieFont.com to illustrate.Research has shown


Pop-up Menus the Right-Click Way

Did you know that right-clicking gives you a pop-up menu with options for what you’re pointing to or have selected? It’s almost like having built-in help tips because these pop-ups are sensitive to the program you’re working in as well as the particular object selected. This is such a handy tool that I right click anytime I’m having trouble with a particular object.

Pop-up MenuAs a for instance try right clicking on the picture of the pop-up menu to your left. Different browsers may give you differently worded options, but those options will have pretty much the same in functions. The pictured menu came from Google Chrome. If your browser is Internet Explorer or Firefox, for instance, your pop-up will be slightly different. Firefox offers a Private window to Chrome’s Incognito window and Internet Explorer offers “Add to favorites…” in place of “Bookmark This Link”.

Applications on your computer may also change the pop-up choices. (Notice the WOT choice. To learn more about the security this app offers check out Getting Clues from “Safe Internet” Applications.)

Right-clicking on images is a great example, however, be aware that text and many other objects offer pop-up helpers. The application or program you are using will also make a big difference. For instance right-clicking on the text in this article will give you a pop-up that’s more concerned with the browser than the text. But if you right-click on text in a word processor you will most likely get a pop-up for formatting or editing the selected text.

Right Clicking on a Mac

To right click on a Mac just hold down the Control key when you click. GCFGlobal has more information on Right-Clicking, including how to change settings and use a trackpad to make pop-ups appear in Section 5 – Common Computer Tasks.

Healthy Computer Habits

This article focuses on Windows computers, however many of the pointers apply to other operating systems.

  1. Reboot your PC at least once a week.
    The restart process performs self-diagnostic chores and most automatic upgrades. Rebooting will often cure minor glitches.
  2. Leave your PC on all night at least once a week.
    Most PCs have schedules that run in the background for such things as checking for updates and performing automatic backup. These scheduled activities are often performed in the wee small hours of the morning so that they will not cause a slowdown when you are likely working.
  3. Accept updates from original software companies.
    Accept only updates you are sure of. It’s best to check the vendor’s support page if you are unsure of the legitimacy of an update. However, it is good policy to accept most updates unless you have an unusual situation.
  4. Keep abreast of news of the latest scams and phishing schemes.
    There are many services that can help you stay alert. For instance, the US Government Consumer Protection site: https://www.usa.gov/scams-and-fraud.
  5. Use security alerts on the Internet
    Many Internet security programs give you safety indicators, such as stars or bars, when you use a search engine. You can also download programs, such as the customer driven Web of Trust, which give you indicators and feedback about the safety and customer satisfaction of various sites.
  6. Back up your data on a regular schedule.
    Windows has a Backup and Restore application that you can open by typing the word backup in the Start Menu search box. You can also use backup services such as SugarSync or Carbonite. Many of these services will give you a free trial or the first few gigabytes free. Some even do continuous backup so that you would never lose more than what you’d done since your last save. Others, such as Dropbox, One Drive and Google Drive, give you a special folder to save documents you want to keep safe.
  7. Use secure passwords and protect their location.
    A secure password is one that is not easily guessed, so children’s and pets’ names are rarely the basis for a secure password. Password requirements are becoming more and more stringent thus making it harder to create passwords we can remember. So it is good to come up with a system of passwords that you can remember without writing down and tucking under your keyboard. I explain one such system in Creating a Secure Password Set That’s Easy to Remember.
  8. Password protect your profile and keep a guest profile for visitors.
    I often work on a PC because the grandkids have loaded a lot of games and/or picked up a bit of malware while visiting. You can prevent most of these threats by password protecting your profile with a secure password and setting up a guest profile as a Standard User with limited permissions. (See User Accounts in Control Panel.)

Those Pesky Characters You Can’t See

Have you ever had to make changes to an electronic document only to have words or pictures jumping all over the page for no apparent reason? Drives you nuts, huh? I find that this type of behavior is often due to typing as if creating a document on a typewriter rather than using a word processor. For instance, people will hold down the space bar to get where they want to put the cursor. Sometimes this doesn’t work, so they’ll give up and press the Enter key or the Tab key, often multiple times.

So what has just happened is that the word processing program remembers every one of those keystrokes. As fast as computers are, that can be hundreds of spaces created in just a few seconds. So what looks like a blank page isn’t really blank. Luckily, most word processing programs and some text editors have a way of seeing all those hidden spaces, tabs and paragraph markers. For instance, Microsoft products use the Show/Hide function that is displayed as a paragraph symbol: ¶. Word Perfect uses the Reveal Codes command. Lotus products give you the option to Show > Hidden Characters.

Most people don’t like to create documents with every space being represented with a dot that looks like an elevated period and tabs that look like arrows, but when your document goes crazy on you, be sure to look for those non-printing characters. And remember, You Can Do It!